
How to create and set up a new project in p:IGI+
Use p:IGI+ projects to interpret geochemical data and create visual artefacts. Proper setup helps maintain reliable data and smooth performance.
Creating a new project
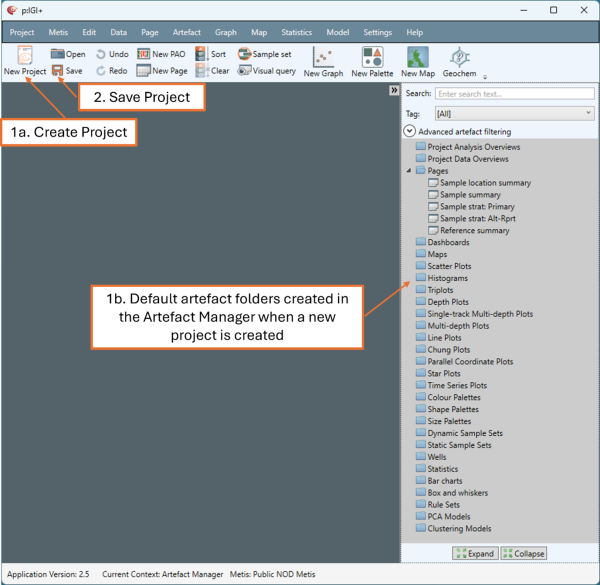
Step 1: Create a new project
-
Click the New Project icon from the shortcut icon menu.
A default project opens with a set of parent artefact folders (blue).
Step 2: Save your project
-
Click the Save icon from the shortcut icon menu.
-
Choose a location, name the file and click Save.
File saves with the extension .pigi2.
A .lock file is also created to prevent simultaneous editing of the same project file by multiple users.
Note: If prompted to ignore a lock when opening an existing project, ensure no one else is using the file, and if OK, hit Yes to avoid data loss.
Setting folder locations
To get the most from p:IGI+, it is important to set the project folder locations appropriately.
Step 1: Set your local projects folder
The local projects folder is used exclusively for p:IGI+ internal operations and should be located on a local drive with fast access times to ensure optimal performance. This folder is not intended for user storage.
-
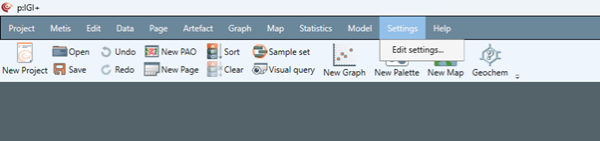
Go to Settings
 Edit settings…
- Under Project in the Settings window, click Choose folder… next to Local projects folder, select a location and click Select Folder.

Step 2: Set your backup projects folder
Used for file recovery. A network drive is recommended for reliability.
-
In the same Settings window, click Choose folder… next to Backup projects folder, select a location and click Select Folder.

Step 3: Recent projects to remember (optional)
Controls how many recent projects appear in the Open recent tab.
-
In the same Settings window, adjust the number next to Number of recent projects to remember.
Note: We recommend retaining the default of 10 projects.
© 2026 Integrated Geochemical Interpretation Ltd. All rights reserved.