
How to prepare Excel files for import into p:IGI+
Geochemical data for import into p:IGI+ can come from various sources. Properly formatting the data in Excel makes importing faster and more reliable.
While there is no single correct workflow, aim to produce Excel tables with clear separation between sample data, property headers, and common metadata. If data are split by analysis method, place each table on a separate worksheet and include consistent identifiers (e.g., well name, sample name, depth) to enable merging after import.
Recommended format:
By the end of processing, your data should be in one or more flat tables within Excel, with properties in columns and samples in rows. Excel import can transpose tables if required. The clearer and more consistent the table structure, the better the software’s table detection will perform.
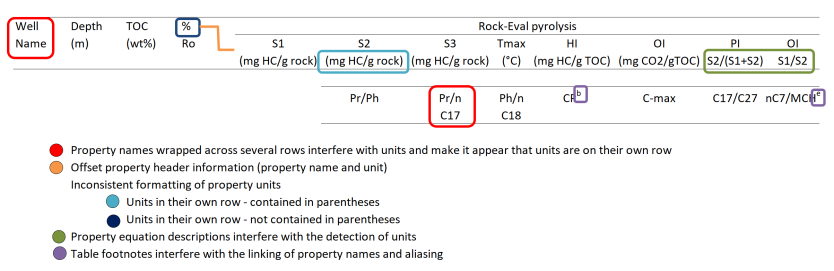
Data tables can have several issues which make formatting complex, as illustrated below. The following steps address these issues.
Step 1: Identify and review data tables
-
Open the Excel file and locate all geochemical data tables (these may be on separate worksheets).
-
Note how many tables there are and what each represents (e.g. fluid analysis, gas analysis, isotope data)
Step 2: Define Samples
- Store all data for each sample on a single row.
- Create a separate sample row when:
- The same sample has been re-analysed in the same lab, resulting in different metadata. Record this using the Repeat.Sample property stating the analysis that has been repeated e.g. "Repeat TOC".
- The same sample has been analysed by different labs, resulting in different metadata or internal sample IDs.
- The data represent child samples from a bulk parent sample (e.g. picked samples). Include sample type and lithology to identify the fraction analysed.
Step 3: Format cells
- Unmerge all merged cells.
- Split any cells containing data ranges (e.g. 4500m-4510m) into two separate cells and remove the unit. Use Text to Columns if helpful.
- Ensure all data within a column use the same unit (e.g. all depths in either metres or feet, not both).
- Remove trailing spaces from all cells using Excel's TRIM and CLEAN functions.
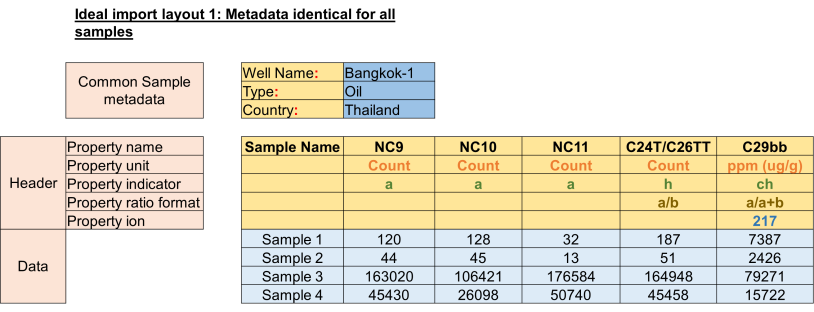
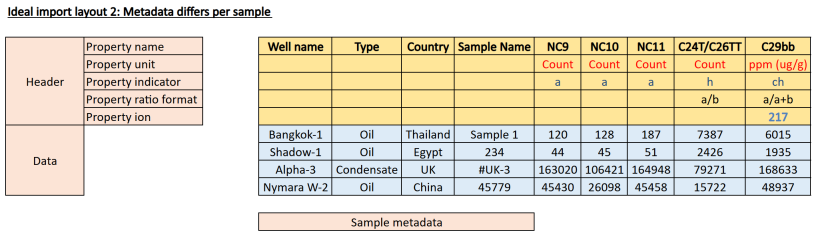
- Keep units consistent in their format:
- Place them on a separate row (see ideal layout 1), or
- Include them in the property name using angled brackets (e.g. < ft >, see ideal layout 2)
- When using multiple worksheets (e.g. split by analysis method), include consistent metadata on each sheet to allow data to be merged after import.
- If all samples have common metadata, record it separately in the top left corner of the spreadsheet (see ideal layout 1) and copy it to every worksheet as needed.
- Use your own property names if preferred. Matching IGI property names helps auto-linking but is not required.
- Place any ratio formats (e.g. a/b or a/(a+b)) in their own header row and mark them accordingly during import.
Step 4: Use Excel tools to prepare the data
- On the home tab:
- Adjust decimal precision as needed

- Use autofill to copy exact entries or generate series

- Adjust decimal precision as needed
- On the data tab:
- Use Text to Columns to split combined data into separate columns.

- Use the Get & Transform Data tools to load, detect, and format data from various sources (PDF, text/CSV, JSON).

- Use Text to Columns to split combined data into separate columns.
Step 5: Verify and Reference
- Keep the Geochemistry Help window open to reference the property model while preparing data for import.
- Complete formatting checks for each table before proceeding to import.
© 2026 Integrated Geochemical Interpretation Ltd. All rights reserved.