How to create, edit and delete project properties in p:IGI+
Project properties let users add fully functional properties to a project so they can view, calculate and use custom/proprietary data not accommodated in the IGI property model.
Creating project properties
Step 1: Create the project property
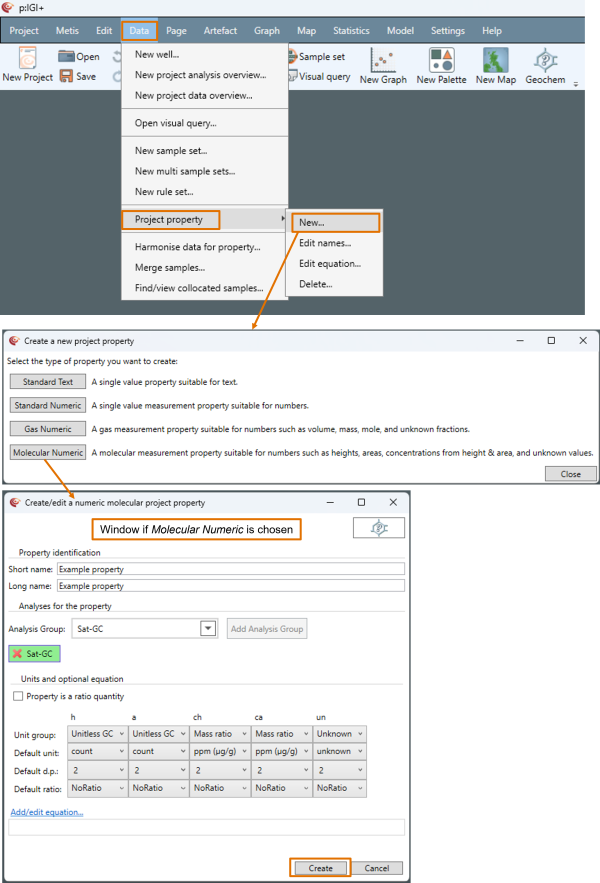
- Go to Data à Project property…à New
-
Choose the property type:
-
- Standard Text
-
-
Standard Numeric (numerical properties without indicators)
-
-
-
Gas Numeric (numerical properties with gas indicators)
-
-
-
Molecular Numeric (numerical properties with molecular indicators)
-
-
Complete the required fields in the creation dialog for the chosen type:
-
-
Give the property a short & long name
-
-
-
Choose the Analysis Group in which you’d like the property to reside
-
Custom is recommended to differentiate user and IGI properties
-
-
-
-
If your property is a ratio, select Property is a ratio quantity
-
-
-
Choose the relevant unit details for your property
-
-
-
If applicable, enter an equation
-
Define all equations in a direct a/b form
-
Any properties for ratios existing across several analysis groups cannot be created by the user.
-
-
-
-
Click OK to add the property to the project
-
After creation, project properties behave like any built-in property.
Note: Project properties exist only inside the project (it is not possible to upload them to a Metis database). Project properties can be transferred to other projects via exporting/importing artefact templates.
Editing project properties
It is possible to edit the name and/or equation for a project property. If further edits are required, it would be necessary to create a new project property, copy any data to this new property and delete the original.
Step 1: Editing a project property name
-
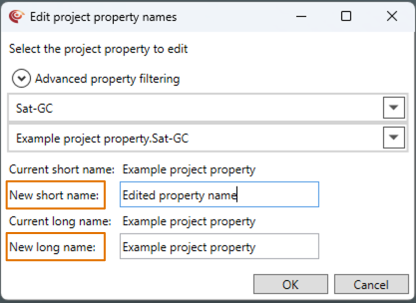
Go to Data à Project property…à Edit names…
-
Select the required project property
Only project properties will appear in the property selector
-
Make the required changes to the New short name and/or New long name fields
-
Select OK
Step 2: Editing a project property equation
-
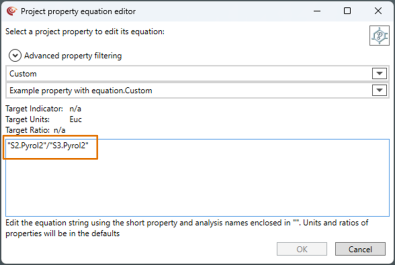
Go to Data à Project property…à Edit equation…
-
Select the required project property
-
Make the required changes to the equation
Edits to the equation are accompanied by a validation to ensure equations are viable.
-
Select OK
Deleting project properties
Follow either Step 1 or Step 2.
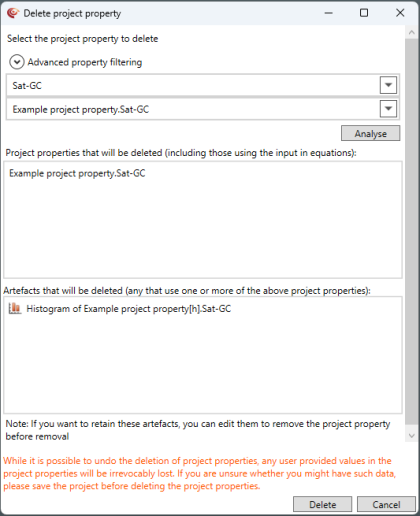
Note: If you delete a project property, artefacts that use it will also be deleted unless you first remove the property from those artefacts.
Step 1: Deleting a project property immediately after creation
-
To remove a project property immediately after creation, use Undo (Ctrl+Z or the Undo shortcut icon). This will fully remove the property and any associated data.
Step 2: Deleting a project property not immediately after creation
-
Go to Data à Project property…à Delete
-
Choose the relevant project property
-
Click Analyse
This will return a list of all artefacts that are using the project property
-
Click Delete
© 2026 Integrated Geochemical Interpretation Ltd. All rights reserved.