How to import sample data into p:IGI+ v3 from Excel
You can import data into p:IGI+ from various sources and file types. The simplest method is to use the built-in Metis database connection. If you don’t use Metis, you can also import from Excel or text files.
Importing from Excel files
Note: You may need to pre-process your Excel file prior to importing into p:IGI+.
Need help? See: How to prepare Excel files for import into p:IGI+
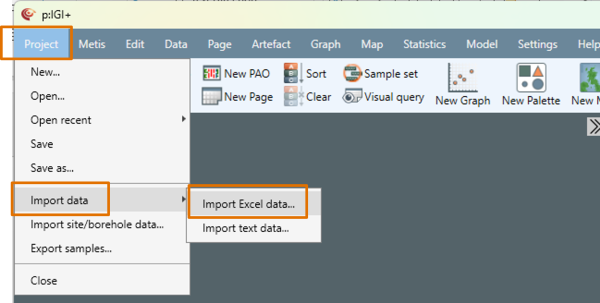
Step 1. Choose your Excel file
- Go to Project
 Import data Import Excel data…
 - Browse to your Excel file and click Open.
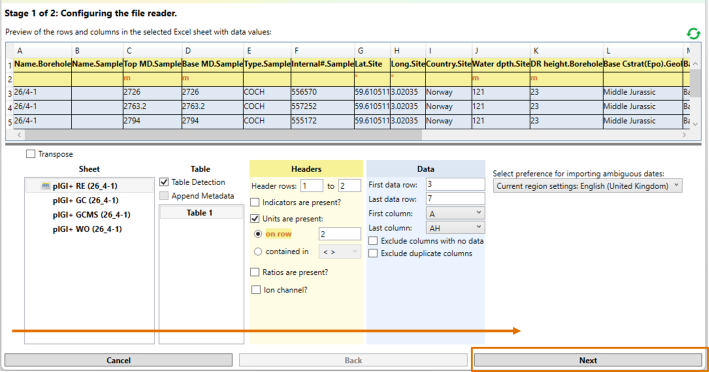
Step 2. Configuring the file reader
The system will display a review of the first 100 rows of the Excel file's first worksheet.
Working from left to right, follow these steps to configure the file for import.
- Sheet: Choose the Excel worksheet containing the data you want to import.
- Table: Enable Table detection to automatically identify headers, data rows and data columns. If more than one table is identified, choose the relevant table.
- Table: Append Metadata to include metadata that is to be applied to all samples.
- Headers: Manually update the Header rows if the automatic table detection hasn’t correctly identified header rows.
- Headers: Tick the relevant property elements that are present in the table header.
- Data: Manually update the data and data column fields if the automatic table detection hasn’t correctly identified the data block.
- Data: Clean up data by excluding any empty or duplicate columns.
- Importing ambiguous formatted time/date data: select your regional preference for how ambiguous date formats are interpreted and imported.
- Select Next.
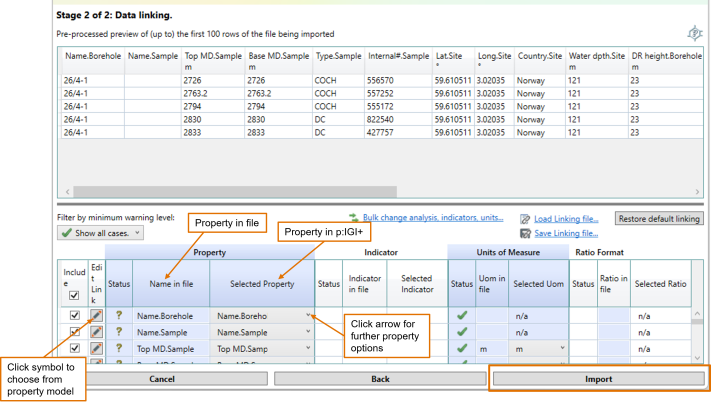
Step 3. Property linking
In this step, properties listed in the Excel sheet (under Name in file) are linked to properties in the p:IGI+ project (under Selected Property).
As a first pass, the import system will attempt to link properties in the Excel file with properties in the IGI geochemical property model. Verify or adjust property links:
- Check that each property in the Excel sheet is correctly linked to a property from the p:IGI+ geochemical property model. If the link is incorrect, either:
- Click the arrow next to the Selected Property and select the correct property from the list, or
- If the correct property is not listed, click the icon under Edit Link to search for it in the IGI property model selector.
-
- If the correct property still can’t be found, create a custom property.
Need help? See: How to create, edit and delete project properties in p:IGI+
Note: Always review the system-generated automated property links.
Create a linking file
2. Select Save Linking file… once you have completed the property linking. This allows you to save a mapped copy of the property linking you’ve just completed.
Linking files are especially useful when working with multiple files in the same format. Instead of repeating the linking process each time, you can save your setup once and reuse it. The next time you import a file in the same structure, opt to Load Linking file… to apply a set of pre-mapped property links – saving time and ensuring consistency.
3. Select Import to progress to the Data Values and Quality window.
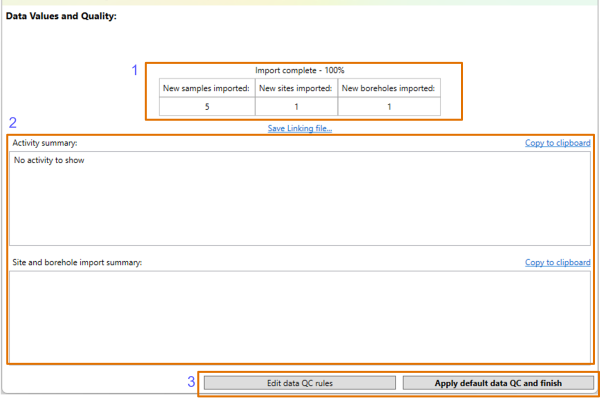
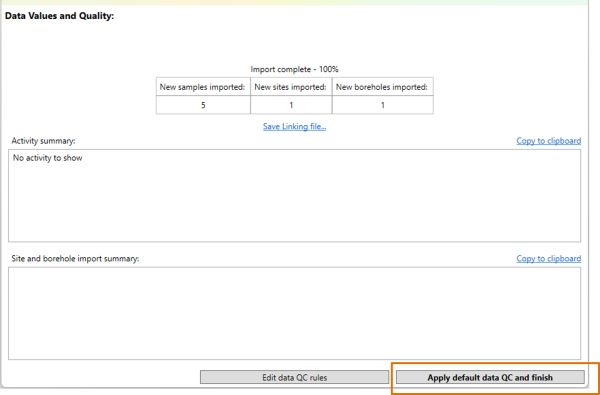
Step 4. Review Data Values and Quality
The Data Values and Quality window shows the import status, and the number of new samples, sites and boreholes imported. Any comments relevant to import will show in the Activity summary and Site and borehole import summary sections.
- Review the number of new samples, sites and boreholes imported.
- Action any activity reported in the Activity summary and/or Sites and borehole import summary sections. Note these can be copied to clipboard for further interrogation.
- Choose to either Edit data QC rules or Apply default data QC and finish.
Note: It is recommended that Edit data QC rules is chosen initially to enable users to become familiar with the default QC rules and to edit them to their requirements.
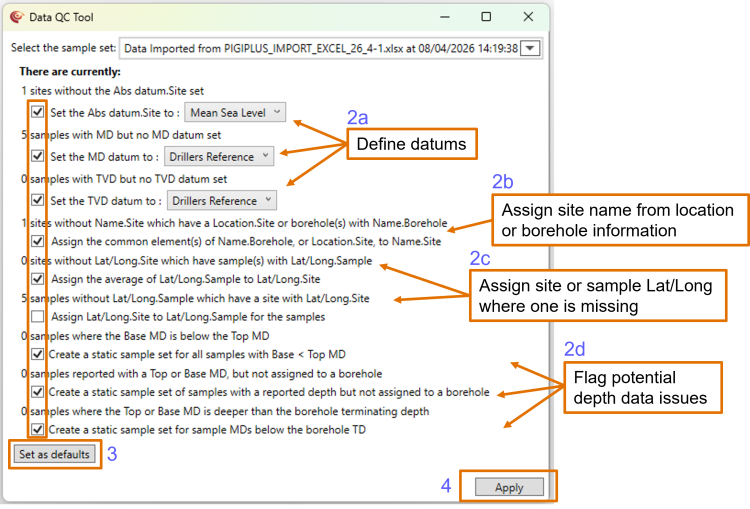
Step 5. Edit data QC rules (optional) and apply data QC rules
1. Edit data QC rules (optional) by clicking Edit data QC rules
2. Select or deselect tick boxes to choose which rules to apply.
Note: It is recommended to use the default parameters unless they are not suitable.
Rules include:
a. Defining required datums
b. Assigning site names from Location.Site or Name.Borehole
c. Assigning site or sample latitude/longitude where available
d. Flagging potential depth data issues
3. If any changes are made to the default rules, select Set as defaults to retain these for future data QC within the project.
4. Select Apply to complete import.
5. If editing of the data QC rules is not required, select Apply default data QC and finish in the Data Values and Quality window.
Note: You will notice a new static sample set of all the samples imported, along with any new sites and boreholes generated in the Sites and boreholes section of the artefact tree.
Additional Feature: Use the Bulk change tool to change analysis type, indicators or units for multiple properties at a time.
- Select Bulk change analysis, indicators, units… in the Data linking window
- Choose the relevant tab:
- Change analyses
- Change indicators
- Change units
- Change solute units
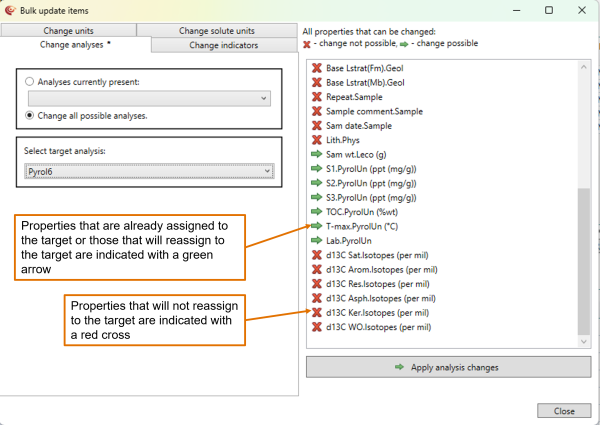
- Choose what to change. Either use the dropdown menu under Analyses/indicators/units currently present to select specific items to change, or select Change all possible analyses/indicators/units to apply changes wherever possible.
- Under Select target analysis/indicator/unit choose the option you would like to re-assign your property element to.
- Properties that are already assigned as the target or will be reassigned to the target are indicated with a green arrow.
- Properties that cannot be reassigned to the target are indicated with a red cross.
Note: Bulk change may not support all changes. Some properties may need to be changed manually.
-
7. Click Apply xxxx changes and close the window to re-assign those properties with green arrows. Those properties that couldn’t be updated through bulk change can now be updated manually in the Data Linking window.
© 2026 Integrated Geochemical Interpretation Ltd. All rights reserved.