Creating Project Properties
Overview
Project properties are designed to enable you to create your own properties. Once defined, a project property behaves like any other property in the software. It has units, can have an equation, can be used in graphs, sample sets, pages etc. You can import data into it, and view data in it. You can create as many project properties as you like - there are no limits. You can share your new project properties with colleagues whenever you export them with artefact templates.
Version: 2.1+ (Aug 2022)
Usage: Data --> Create project property...
How to use in practice
Project properties are powerful concepts, allowing you to add your own properties, with or without equations, to your projects. Project properties are fully fledged properties in the project, and can be used in pages, plots etc. It is important that you carefully manage project properties if you want to share these across your organisation - when created projected properties are given a unique identity in that project. When shared with others using templates that identity is preserved, but when you create a new project property with an identical name, it will have a different identity in the system, and you will not be able to share data or artefacts despite the identical name.
The one exception to the general property behaviour is that in Metis Transform, project properties will never be uploaded to the central Staging database. They are project properties.
Creating project properties
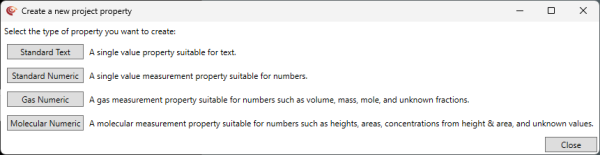
When creating a project property you need to decide on the type of property you wish to create:
- Standard – a typical property in p:IGI+ with one value per sample, either text or numeric.
- Gas – a numeric gas property in p:IGI+ which might be measured as a volume, mol or mass fraction, or be of unknown fraction.
- Molecular – a numeric property typically measured by GC(MS) which can be measured as a height, area, concentration from height or concentration from area, or may be of unknown measurement.
Once the property type is selected you will be taken to the appropriate creation dialogue. The dialogues are similar but will present only the relevant options for the particular property type you are creating. But all include similar elements.
To learn how to add equations to numeric, gas and molecular properties click here.
Using project properties
Having created the property it will now appear like any other property in the software and can be found using the standard property selector – just start typing the name of your new property and you can use this right across the system, in graphs, sample sets, pages, as an input to another equation for another new property. The only difference to the standard IGI supplied properties in p:IGI+ is that project properties only exist within the project you have created. At present the only way to remove a project property from p:IGI+ is to undo the creation (using Ctrl+Z, or the undo icon); this completely removes the project property from the system.
Note that you should only set the ratio to something other than NoRatio if you want users to be able to change from normalised a/(a+b) to un-normalised a/b, and also the inverse of those: b/a and b/(a+b).
Sharing project properties
The project property only exists within the project in which it was created. What if you want to share a graph (with overlays etc) that you created that help interpret the new project property. No problem, simple export the graph as a template, send this to your colleague and they can import the graph into their project. This will create your project property (and any associated equation) in their project, evaluate the equation in their project (this can cause the application to freeze for a short time on loading the template in big projects) and create your graph complete with overlay.
If you want to share a large number of project properties add them to a new page you have created and share the template for this page – this will add all project properties to another project. Be aware that creating project properties, particularly with equations, can be slow on large projects.
Editing / Deleting project properties
Project properties can be edited to rename, or deleted once created, although you will have to remove the project properties from artefacts that use them before you are able to delete them, or you will be forced to delete the artefacts.
From version 2.3 a project properties equation can be edited using Data -> Edit project property equation...
From the Data -> Delete Project Property… menu option, first select the project property to remove – only project properties will be shown in the selector. Then hit the Analyse button – this will inspect the whole project to see where those project properties are used. If you select to delete the project property all artefacts using it will also be deleted. To retain artefacts using the project property, first remove property from the artefact prior to deletion. If you do accidentally delete a project property this can be undone, but any data added to the project property will be lost.
© 2026 Integrated Geochemical Interpretation Ltd. All rights reserved.